|
"rotating
tunnel that you walk through" FAQ's
|
- Q: Why did you
change the name from Vortex Tunnel to "rotating tunnel that you
walk through?
- A: I got this
request asking me to change the name because "Vortex"
is a "trade" name. Many people thought I should fight back,
since this type of tunnel has been called a vortex tunnel for many years,
but it really wasn't that important to me what my tunnel was called.
I did some checking on-line through the US Patent and Trademark Office
and it appears that "Vortex Tunnel" is not an officially registered
trade mark.
|
- Q: What kind of
fabric do you use as a lining?
- A: When it came
time to purchase the fabric lining, we'd already spent way too much
on the tunnel construction and I didn't want to spend another $300 on
fabric, so my wife purchased the cheapest black fabric we could find
from the fabric store. I don't know what it's called, but it was less
than $2 a yard and is pretty thin. By luck, the fabric width turned
out to be EXACTLY perfect for running between the horizontal ring supports.
The downside of such cheap fabric is that it doesn't block light well
so the tunnel must be enclosed to eliminate outside references. The
upside to the fabric is that it's very light weight and has held up
pretty well to usage over the last several years.
|
- Q: How do you
attach the fabric to the rotating tunnel?
- A: We use staples.
It's pretty time consuming and a hassle and it tends to rip the fabric
a bit, but it's inexpensive and works ok. I've always wanted to develop
a system of snaps for attachment of the fabric to the tunnel but haven't
done it yet.
|
- Q: What do you
use to paint the dots and lines on the fabric?
- A: We use Krylon
florescent spray paint from the local hardware store. It takes two or
three coats to make the colors stand out, but it's very quick and easy
to apply, works well with black light and the effect is outstanding.
|
- Q: How do you
shoot the video in the tunnel?
- A: The tunnel
is lit with black lights (UV) and most cameras, be it still or video,
will not work with UV at all. The trick was to add lighting that a camera
would respond to without spoiling the effect. The answer was to use
a camera sensitive to IR lighting and supplement the tunnel with IR
lights. Many people have reported they've had good luck with the inexpensive
security cameras that Harbor
Freight sells, so I picked up both a color and black and white version
when they were on sale. I think I paid less than $50 for both of them.
A test of the two cameras showed virtually no difference under IR lighting,
I think I chose to go with the black and white camera, but I recall
it was a toss-up between the two. It's important to note that the IR
lights that come with these cameras are completely useless if you're
trying to shoot more than a couple of feet from the camera. I did some
experimenting and ended up adding about 90 IR LEDs mounted above the
exit to the tunnel.
|
- Q: What kind of
IR LEDs did you use to illuminate the tunnel for the video?
- A: There are two
types of IR LEDs commonly available, 850nm and 940nm. What's the difference
between the two? The human eye can detect light in the 380-750nm range.
Since the 850nm LED is fairly close to this range, you can see a faint
red glow from the LED, where the 940nm LED appears completely dark.
I would have preferred to have gone with the 940nm LED, but in tests
with the Harbor Freight camera, it just didn't produce enough light
so I opted for the 850nm LED. They do give off the red glow but it's
not too distracting in the tunnel. I purchased my IR LEDs from BG
Micro.
|
- Q: My tunnel will
be indoors and I don't have room for the 10' diameter rings, can I use
a smaller size?
- A: I know of a
haunter (Spirit Kanaka) that uses 9' diameter rings with success. My
concern is that anything smaller will be too close to your partons and
it's too easy to reach out and touch the tunnel walls which can cause
lots of problems. 10' works great and I'll stick with that.
|
- Q: How well do
your wooden rings hold up?
- A: My wooden rings,
which are made up of 1/2" overlapping plywood, are very fragile
individually, but when attached together, are very strong and work well.
Through years of usage, they've "worn in" and seem to be getting
better with age. However, I live in Southern California where it's dry
most of the time. The rings have gotten a little damp before and have
swollen up a bit. I would not recommend the wooden rings in a wet, high
humidity climate unless they are well protected.
|
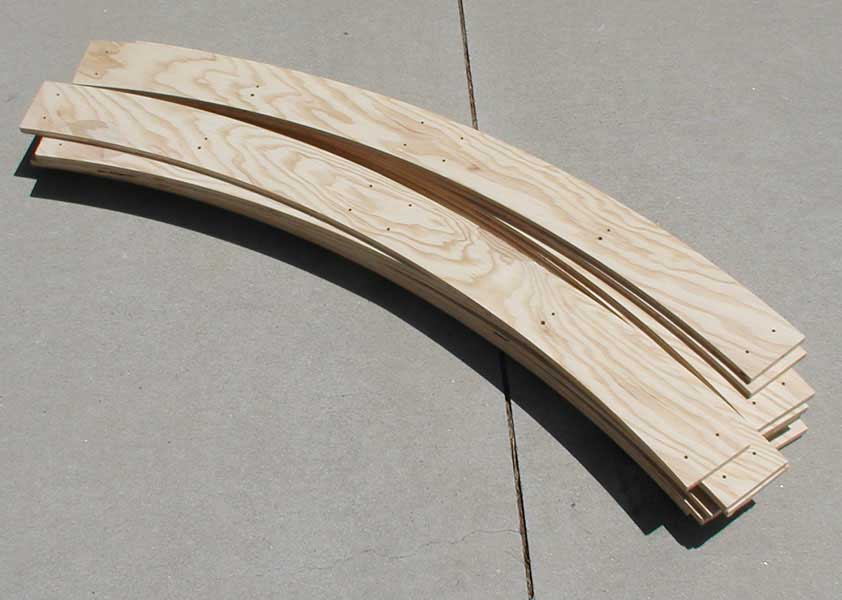
- Q: Can I purchase
a template for the spinning tunnel hoops?
- A: I don't have
a template for the hoops. The hoop sections are not too hard to duplicate.
If you look at this
picture, each one of the sections is 1/8th of a 10' outside diameter
circle. The sections are 4" wide and made from 1/2" plywood.
The hole spacing allows them to be overlapped and allows for cross members,
which connect the rings together, to be attached
|
- Q: Aloha Terry,
I lead a hands on science program, Earl's Garage, in Kamuela Hi. This
will be the 7th year we have made a mechanical Haunted House. This year
we are making the tunnel using your plans. I can't tell you how excited
everyone is. We have the rings cut and we are using a motor that was
used to drive a robot they entered in "FIRST". What we don't
understand is how the 2x3 hoop connector boards are connected. In your
plans it shows the bolt inserted all the way down in the connector boards,
and the tee nut also. Could you please elaborate?
- A: The connection
of the 2x3's to the end rings are pretty straight forward. About 2"
in from the end of the 2x3 is a 1" hole drilled all the way through
the board and is squared off (creating the "D" shape), as
shown in the diagram on the web page, so that it can accommodate the
tee nut. A hole is drilled lengthwise into the center of the 2x3 end,
all the way to the hole created in the previous step. The tee nut is
inserted as shown in the diagram. A 1/4" x 3 1/2" bolt (with
washer) is inserted through a hole in the ring, into the hold drilled
in the end of the 2x3 and into the tee nut.
For the center
ring, the end of one 2x3 is prepared exactly as above. The end of
the 2x3 that goes on the opposite side of the ring needs to be prepared
so that the 5 1/2" long bolt can can be inserted and have enough
room to get a socket wrench in to tighten the bolt. To make the elongated
"D" hole in that end of the 2x3, I drilled two 1" holes
side-by-side and then used a chisel to combine them and square off
the end as shown in the drawing. I then drilled a hold in the end
of the 2x3 as above. In order to get the 5 1/2" bolt into this
"D" hole and out the end of the 2x3, I made a slot in the
2x3, about 3 1/2' long, 5/8" wide and about 5/8" deep extending
out from the "D" hole. I used a router with a straight cutting
bit to create this slot, a chisel could be used if a router is not
available.
|
- Q: What kind of
lighting do you use in the tunnel?
- A: The tunnel
is lit using four 18" single tube blacklight fixtures, two mounted
to each side of the bridge
|